Email Setup for Thunderbird (Windows and Mac)
Print
Before you start:
A) Make sure you have the correct email settings for your account. You can find these here.
B) If you don't have the email password, you can reset it here.
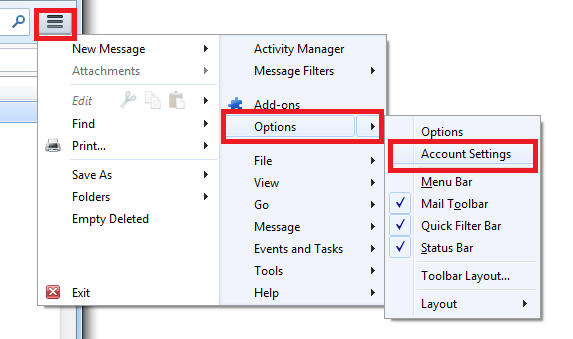
Step 1 - Click on the top right Menu button > Options > Account Settings.

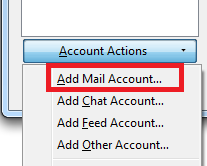
Step 2 - Click on Account Actions > Add Mail Account.

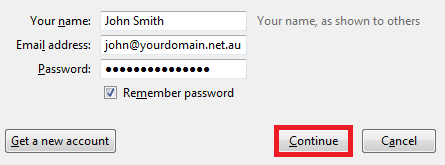
Step 3 - Add your account details and click Continue.

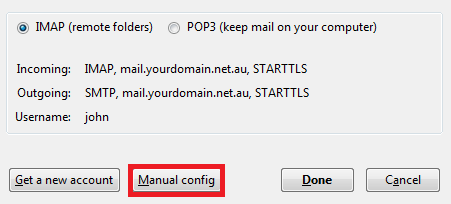
Step 4 - Select IMAP and Manual config.

Step 5 - Make sure the account settings are correct, click Re-test then click Done.

Step 6 - Test the email account by sending an email from / to your email address (e.g. from john@yourdomain.net.au to john@yourdomain.net.au). If this device can receive mail, the incoming server settings are correct. If the device can send mail, the outgoing server settings are correct as well.
For more tutorials on accessing emails and setting up email clients, view our Email Setup Guides.
- 27-07-2020 10:27
Email Setup for Thunderbird (Windows and Mac)
Before you start:
A) Make sure you have the correct email settings for your account. You can find these here.
B) If you don't have the email password, you can reset it here.
Step 1 - Click on the top right Menu button > Options > Account Settings.
Step 2 - Click on Account Actions > Add Mail Account.
Step 3 - Add your account details and click Continue.
Step 4 - Select IMAP and Manual config.
Step 5 - Make sure the account settings are correct, click Re-test then click Done.
Step 6 - Test the email account by sending an email from / to your email address (e.g. from john@yourdomain.net.au to john@yourdomain.net.au). If this device can receive mail, the incoming server settings are correct. If the device can send mail, the outgoing server settings are correct as well.
For more tutorials on accessing emails and setting up email clients, view our Email Setup Guides.
Related Articles
© Crucial