Fix Email Settings in Thunderbird (Windows and Mac)
Print
Fix Email Settings in Thunderbird (Windows and Mac)
If your email account has stopped working, an update or crash may have caused some settings to change. This guide will take you through the email settings so you can go through and fix everything up.
Before you start:
A) Make sure you know the correct email settings for your account. You can find these here.
B) If you don't have your email password, you can find it here.
C) If your settings are correct but your device still isn't connecting, use this guide to resolve an IP block.
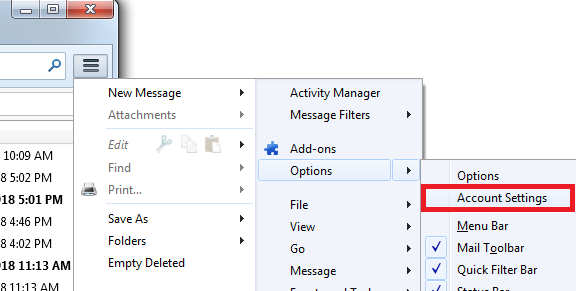
Step 1 - Go into the Account Settings.
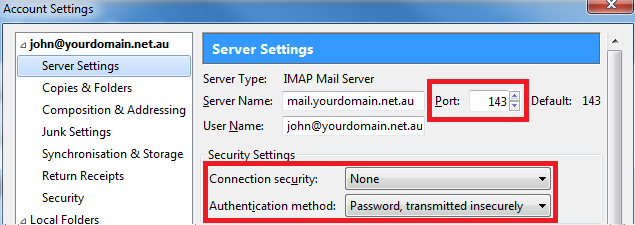
Step 2 - Click on Server Settings under the email address you want to fix.
(1)
Server name is normally mail.yourdomain.com.au.
(2)
Username is the full email address.
(3)
Port is always 993 (IMAP Mail Server) or 995 (POP Mail Server) when using SSL/TLS.
(4)
Set this to SSL/TLS.
(5) Make sure this says Normal password.

Note: Occasionally, the SSL settings won't work due to network settings on your end. If the above don't work after you test your email, you can use the Non SSL settings bellow. Just note that if you use POP instead of IMAP, the incoming port is 110.
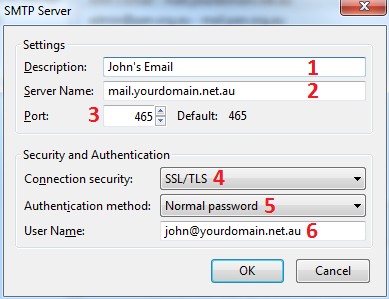
Step 3 - (1) Click Outgoing Server, (2) select your email account, (3) click Edit.

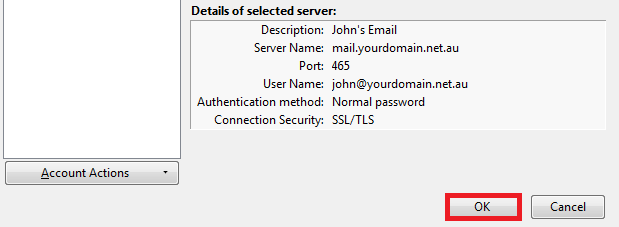
Step 4 - Click OK once you've updated the settings here.
(1) This can be anything you want it to be.
(2) Should be the same as your Incoming Server setting.
(3) Port should be 465.
(4) Set this to SSL/TLS.
(5) Always use Normal Password.
(6) Username should be the full email address.
Note: Occasionally, the SSL settings won't work due to network settings on
your end. If the above don't work after you test your email, you can use the Non SSL settings below.
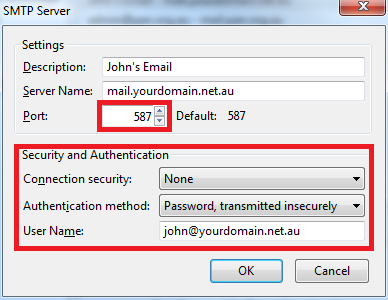
Step 5 - Click OK to save the changes. Test the email by sending an email from / to your email address (eg: from john@yourdomain.net.au to john@yourdomain.net.au). If a popup box comes up and asks for your password, put it in then.
For more tutorials on accessing emails and setting up email clients, view our Email Setup Guides.
- 24-07-2020 17:36
Fix Email Settings in Thunderbird (Windows and Mac)
If your email account has stopped working, an update or crash may have caused some settings to change. This guide will take you through the email settings so you can go through and fix everything up.
Before you start:
A) Make sure you know the correct email settings for your account. You can find these here.
B) If you don't have your email password, you can find it here.
C) If your settings are correct but your device still isn't connecting, use this guide to resolve an IP block.
Step 1 - Go into the Account Settings.
Step 2 - Click on Server Settings under the email address you want to fix.
(1)
Server name is normally mail.yourdomain.com.au.
(2)
Username is the full email address.
(3)
Port is always 993 (IMAP Mail Server) or 995 (POP Mail Server) when using SSL/TLS.
(4)
Set this to SSL/TLS.
(5) Make sure this says Normal password.
Note: Occasionally, the SSL settings won't work due to network settings on your end. If the above don't work after you test your email, you can use the Non SSL settings bellow. Just note that if you use POP instead of IMAP, the incoming port is 110.
Step 3 - (1) Click Outgoing Server, (2) select your email account, (3) click Edit.
Step 4 - Click OK once you've updated the settings here.
(1) This can be anything you want it to be.
(2) Should be the same as your Incoming Server setting.
(3) Port should be 465.
(4) Set this to SSL/TLS.
(5) Always use Normal Password.
(6) Username should be the full email address.
Note: Occasionally, the SSL settings won't work due to network settings on
your end. If the above don't work after you test your email, you can use the Non SSL settings below.
Step 5 - Click OK to save the changes. Test the email by sending an email from / to your email address (eg: from john@yourdomain.net.au to john@yourdomain.net.au). If a popup box comes up and asks for your password, put it in then.
For more tutorials on accessing emails and setting up email clients, view our Email Setup Guides.
Related Articles
© Crucial