Setup Email on an Android Device
Print
A) Make sure you have the correct email settings for your account. Click here for a guide on finding your correct email settings. Other than the username (Email Address) and password, all settings will be exactly the same for all email accounts on the same domain.
B) If you're unsure what your email password is, click here for a guide on how to change it
Step 1 - Click on Settings

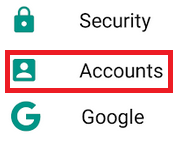
Then click Accounts
And select Add account

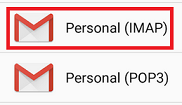
Step 2 - Select IMAP
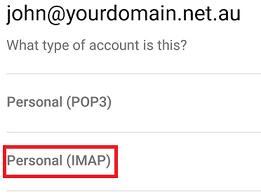
Type your email address and click MANUAL SETUP

Select Personal (IMAP)
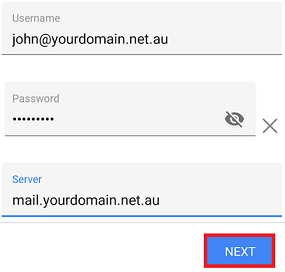
Step 3 - Add in the Incoming Server details and click Next

Add in the same settings again for the Outgoing Server and click Next
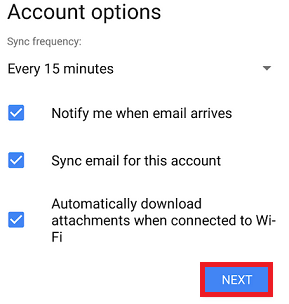
Step 4 - Click Next on this screen
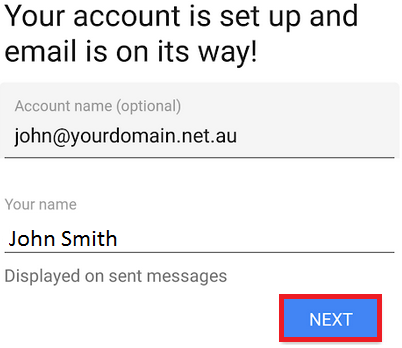
Type your name in and click Next to finish the setup
- 13-08-2018 15:17
Setup Email on an Android Device
Before you start:A) Make sure you have the correct email settings for your account. Click here for a guide on finding your correct email settings. Other than the username (Email Address) and password, all settings will be exactly the same for all email accounts on the same domain.
B) If you're unsure what your email password is, click here for a guide on how to change it
Step 1 - Click on Settings
Then click Accounts
And select Add account
Step 2 - Select IMAP
Type your email address and click MANUAL SETUP
Select Personal (IMAP)
Step 3 - Add in the Incoming Server details and click Next
Add in the same settings again for the Outgoing Server and click Next
Step 4 - Click Next on this screen
Type your name in and click Next to finish the setup
Related Articles
© Crucial