Fix Email Settings in Mac Mail
Print
Before you start:
A) Make sure you know the correct email settings for your account. You can find these here.
B) If you don't have your email password, you can find it here.
C) If your settings are correct but your device still isn't connecting, use this guide to resolve an IP block.
New version
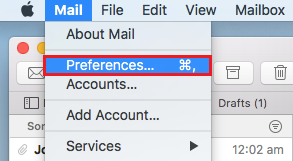
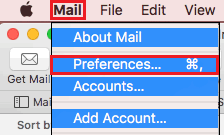
Step 1 - Click on Mail > Preferences.
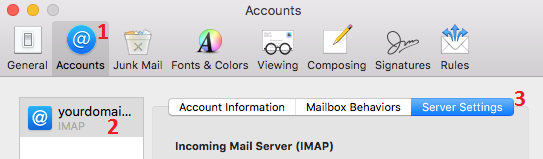
Then click Accounts, select the email account you want to fix, and click Server Settings.
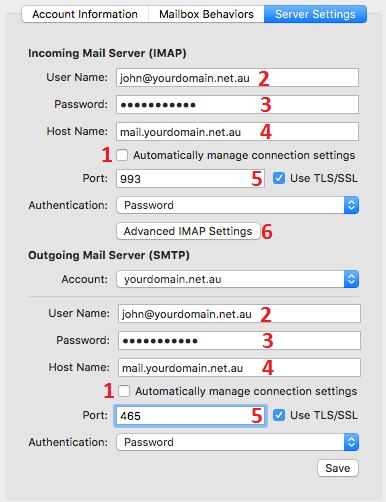
Step 2 -
(1) Untick "Automatically Manage", as Mac Mail can automatically use the wrong settings.
(2) Make sure the Username for Incoming and Outgoing is the full email address.
(3) If your password is in there, keep it as it is. Come back to this and re-add the password if your email still fails after checking the other settings. Use the same password for both incoming and outgoing.
(4) Add your host name / incoming or outgoing server. It will be the same for both.
(5) Tick 'Use TLS/SSL' and make sure the correct port is used (IMAP: 993, POP: 995, SMTP: 465).
(6) Click on Advanced IMAP Settings (If your Incoming Mail Server says POP rather than IMAP, just hit Save down the bottom left and skip to step 4).
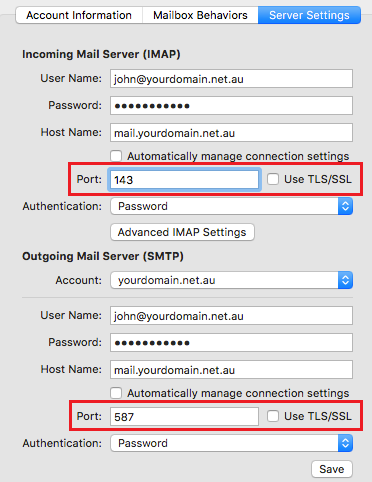
NOTE: On rare occasions, due to some network settings on your router/firewall/office network, the SSL settings above don't work. If you continue having problems, try these settings instead.
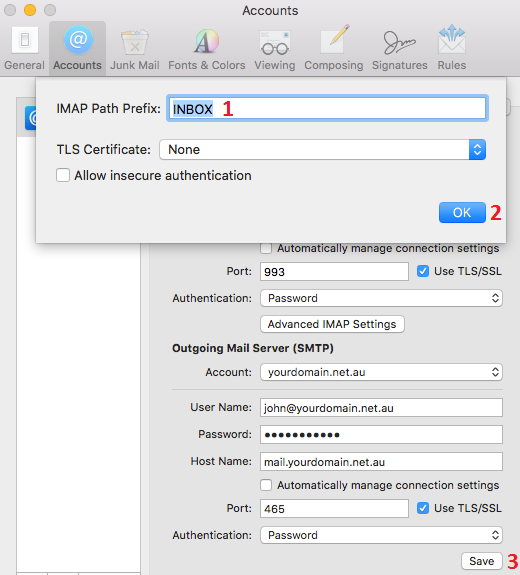
Step 3 - (1) Set the IMAP Path Prefix to INBOX, then (2) click OK and (3) click Save.
NOTE: On rare occasions, you will still get a password error, even after double checking that you've added in the correct password. If this happens:
Step 3.1 - Click on the settings icon,

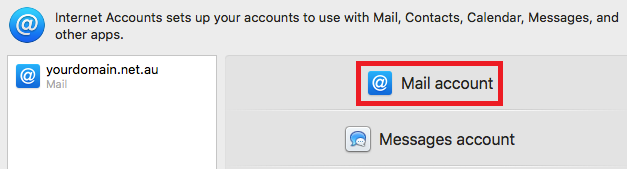
Then click on Internet Accounts.

Step 3.2 - Select the email you're having trouble with then click Mail Account.
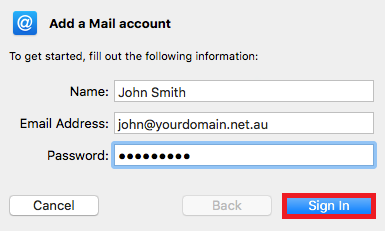
Step 3.3 - Update your password here and click Sign In.
Step 4 - Close the Mac Mail program completely, then test the email by sending an email from / to your email address (e.g. from john@yourdomain.net.au to john@yourdomain.net.au). If a pop up box comes up and asks for your password, put it in then. We would also recommend restarting the computer to ensure that the old settings are no longer being used.
Old version
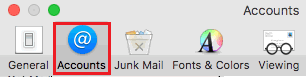
Step 1 - Click on Mail then Preferences.
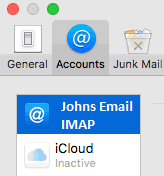
Then click Accounts and select your account.
>
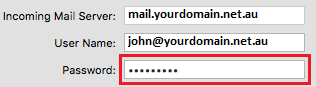
Step 2 - Delete and retype the password under Incoming Mail Server.
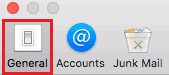
Click on General and hit the save button when prompted, then click back on Accounts.
>
Step 3 - Click on the option for Outgoing Mail Server, then click on Edit SMTP Server List.

>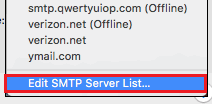
Make sure to select the correct email account from the list

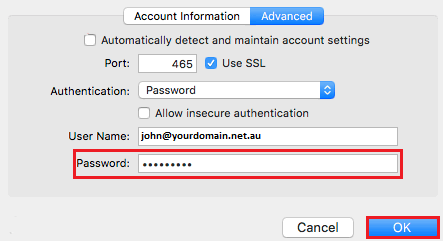
Step 4 - Update the password and click OK.
Step 5 - Close the Mac Mail program completely, then test the email by sending an email from / to your email address (e.g. from john@yourdomain.net.au to john@yourdomain.net.au). If a pop up box comes up and asks for your password, put it in then. We would also recommend restarting the computer to ensure that the old settings are no longer being used.
For more tutorials on accessing emails and setting up email clients, view our Email Setup Guides.
- 24-07-2020 17:31
Fix Email Settings in Mac Mail
If your email account has stopped working, an update or crash may have caused some settings to change. This guide will take you through the email settings so you can go through and fix everything up.Before you start:
A) Make sure you know the correct email settings for your account. You can find these here.
B) If you don't have your email password, you can find it here.
C) If your settings are correct but your device still isn't connecting, use this guide to resolve an IP block.
New version
Step 1 - Click on Mail > Preferences.
Then click Accounts, select the email account you want to fix, and click Server Settings.
Step 2 -
(1) Untick "Automatically Manage", as Mac Mail can automatically use the wrong settings.
(2) Make sure the Username for Incoming and Outgoing is the full email address.
(3) If your password is in there, keep it as it is. Come back to this and re-add the password if your email still fails after checking the other settings. Use the same password for both incoming and outgoing.
(4) Add your host name / incoming or outgoing server. It will be the same for both.
(5) Tick 'Use TLS/SSL' and make sure the correct port is used (IMAP: 993, POP: 995, SMTP: 465).
(6) Click on Advanced IMAP Settings (If your Incoming Mail Server says POP rather than IMAP, just hit Save down the bottom left and skip to step 4).
NOTE: On rare occasions, due to some network settings on your router/firewall/office network, the SSL settings above don't work. If you continue having problems, try these settings instead.
Step 3 - (1) Set the IMAP Path Prefix to INBOX, then (2) click OK and (3) click Save.
NOTE: On rare occasions, you will still get a password error, even after double checking that you've added in the correct password. If this happens:
Step 3.1 - Click on the settings icon,
Then click on Internet Accounts.
Step 3.2 - Select the email you're having trouble with then click Mail Account.
Step 3.3 - Update your password here and click Sign In.
Step 4 - Close the Mac Mail program completely, then test the email by sending an email from / to your email address (e.g. from john@yourdomain.net.au to john@yourdomain.net.au). If a pop up box comes up and asks for your password, put it in then. We would also recommend restarting the computer to ensure that the old settings are no longer being used.
Old version
Step 1 - Click on Mail then Preferences.
Then click Accounts and select your account.
>
Step 2 - Delete and retype the password under Incoming Mail Server.
Click on General and hit the save button when prompted, then click back on Accounts.
>
Step 3 - Click on the option for Outgoing Mail Server, then click on Edit SMTP Server List.
>
Make sure to select the correct email account from the list
Step 4 - Update the password and click OK.
Step 5 - Close the Mac Mail program completely, then test the email by sending an email from / to your email address (e.g. from john@yourdomain.net.au to john@yourdomain.net.au). If a pop up box comes up and asks for your password, put it in then. We would also recommend restarting the computer to ensure that the old settings are no longer being used.
For more tutorials on accessing emails and setting up email clients, view our Email Setup Guides.
Thank you for your feedback on this article.
Related Articles
© Crucial