How to restore Emails, Files and Databases using R1soft automated backups in cPanel
Print
Note: If you would like, we would charge a one-time fee of $40 to perform this service on your behalf. To request this, just submit a support ticket through your Client Area and let us know:
Specify which domain you would like to have restored, how far back you'd like it restored from, and what you'd like restored (e.g. site files and database)
We take backups every 8 hours and store these for a week. To find the exact restore points available, you can follow the first few steps of this guide to log into your R1Soft backup management area.
Step 1 - Log into the CPanel account (guide here).
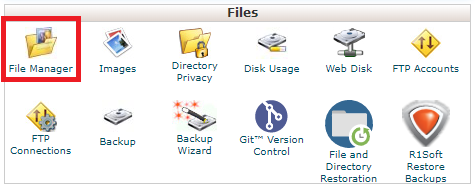
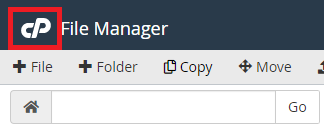
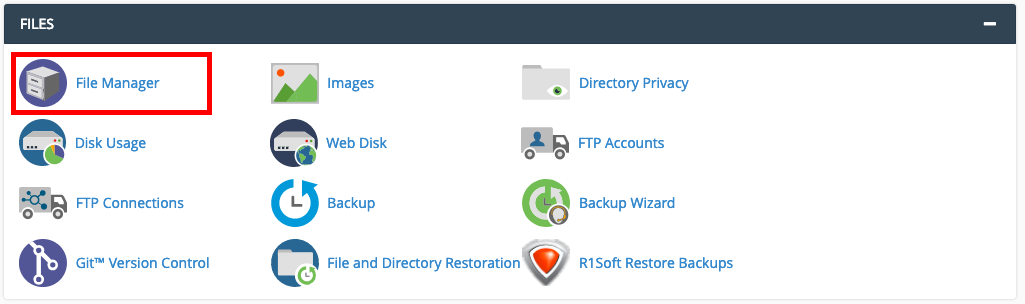
Step 2 - Click on File Manager.
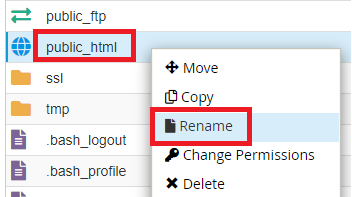
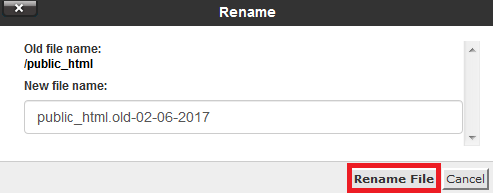
Step 3 - Find the public_html directory and rename it to 'public_html.old-currentdate' or similar.
Note: The R1Soft backup restore software overwrites all files, even if the content was different. However it does not remove files that were not present at the time of the backup. By effectively removing the entire directory we are ensuring that the files are restored exactly how they were at the time the backup was taken.
As long as there are no files in the public_html directory, your website will display a 404 error. Bear this in mind when performing a website restore.
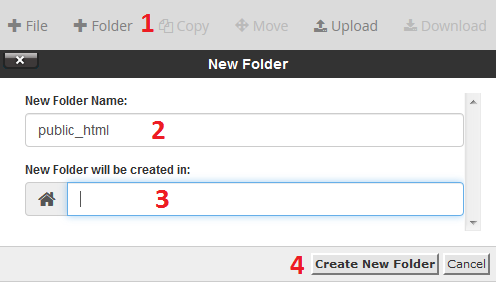
Step 4 - Create a new public_html folder. This will make the restored files go into a clean folder.
(1) Click on +Folder.
(2) Type public_html.
(3) Leave the second field blank.
(4) Click Create New Folder.
Step 5 - Click on the cP button in the top left of the page to go back to the main page of cPanel.
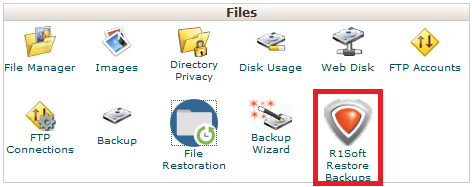
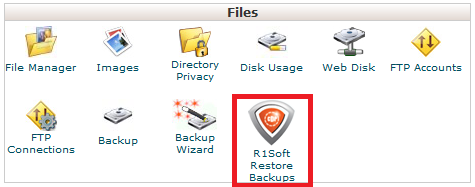
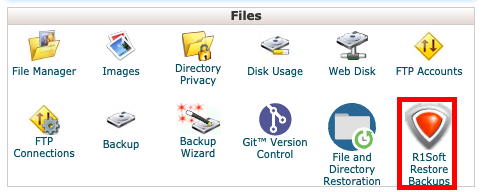
Step 6 - Click on the R1Soft Restore Backups icon.

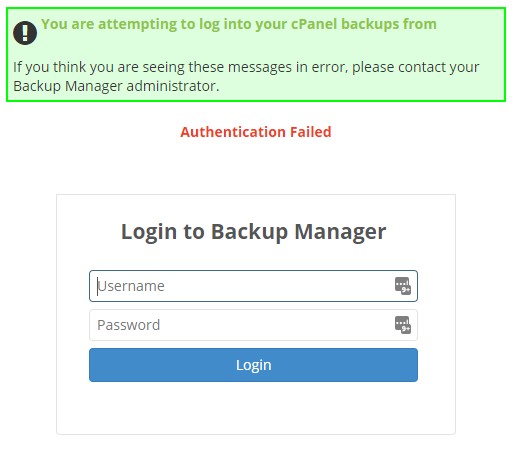
Sometimes when logging in via your Client Area or a Reseller account, you may get this screen. If so, simply enter the cPanel Details again.
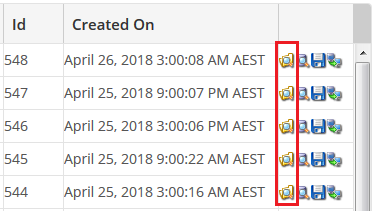
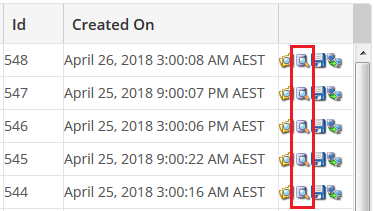
Step 7 - R1Soft will now open, and the dates and times of available backups will be listed under “Created On”. Click on the Folder icon next to the date you wish to restore.
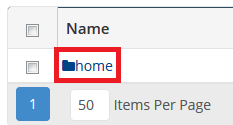
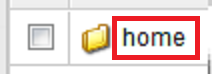
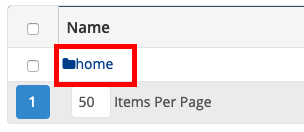
Step 8 - Double click on the Home folder.
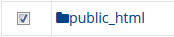
Step 9 - Check the box next to the folder you wish to restore. For a full website restore, select the public_html folder.
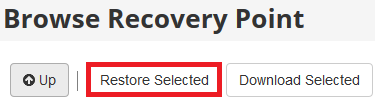
Step 10 - Scroll up and click Restore Selected.
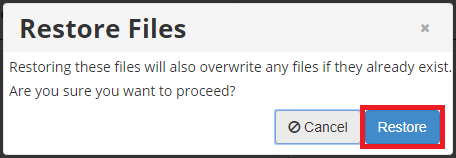
Step 11 - Click Restore to begin.
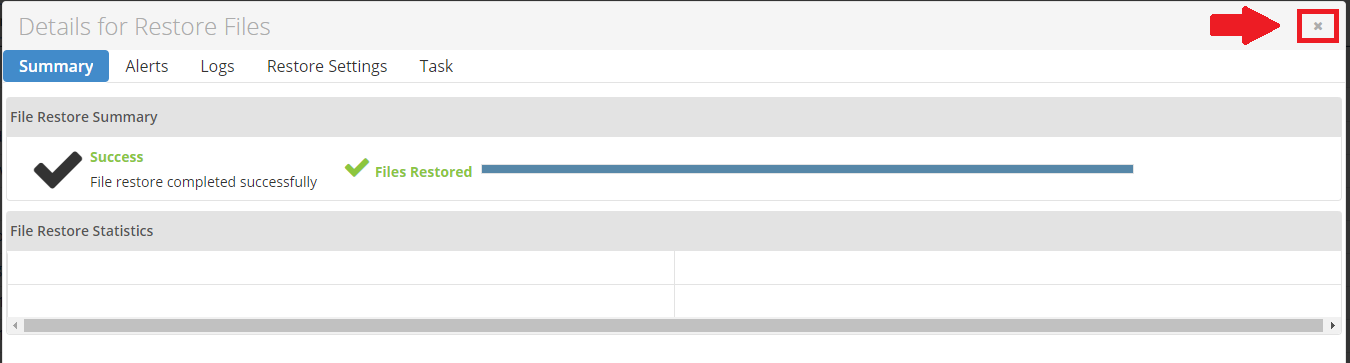
Step 12 - Once the restore is finished you can close the window.
Note: You may get some errors under Files Failed. It's often OK to get a few of these, as they're just cache files which aren't needed when restoring website data
Once the restore is complete, we'd recommend testing your website in a non-cached browser. If the site still shows errors, you may need to restore the database as well.
How to Restore Database Data
Step 1 - Log into the CPanel account (guide here).
Step 2 - Click on the R1Soft Restore Backups icon.
Sometimes when logging in via your Client Area or a Reseller account, you may get this screen. If so, simply enter the cPanel Details again.
Step 3 - Click on the Database icon next to the date you wish to restore.
Step 4 - Clicking the arrow symbol next to Databases will display a list of all the backed up databases, then tick the box next to the database you wish to restore. If you see multiple databases and don't know which is the right one, click here for our guide on finding the database name.
If restoring a deleted database, the database will need to be created in cPanel with the same name in the cPanel Databases utility, or else it will not appear in R1soft.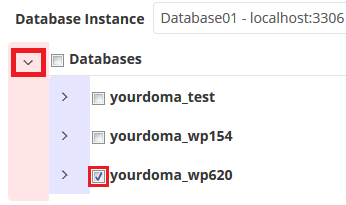
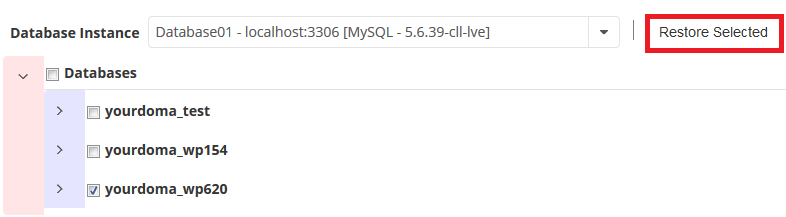
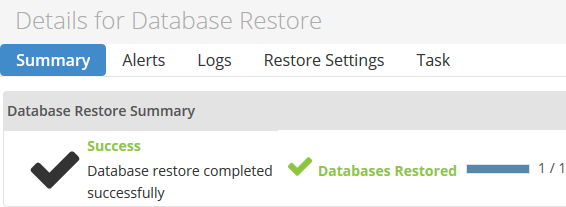
Step 5 - Click Restore Selected.
The database will now begin restoring. Close the window once the restore is complete.
These are advanced guides and may take some time to complete. Before starting, please check if your emails are in MDBox or MailDir format, because the restore process is different.
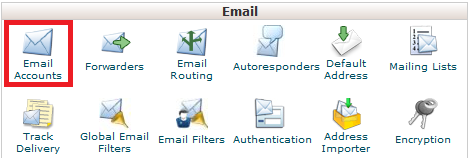
Note: If the email account was deleted from cPanel, you'll first have to create it again from the Email Accounts tool in cPanel.
Step 1 - Log into CPanel and navigate to File Manager.
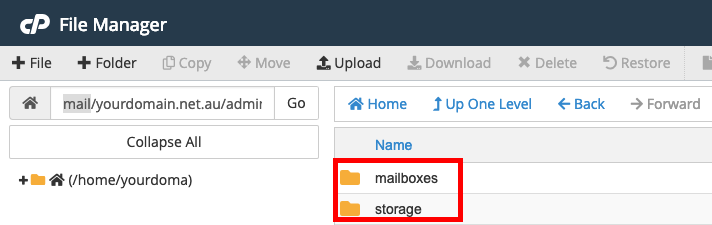
Step 2 - Navigate to mail/<yourdomain name>/<email account name>. In this example, we will be using admin@yourdomain.net.au, therefore we will go to the directory mail/yourdomain.net.au/admin.
Once you are there, if you see folders named mailboxes and storage, then the email format is MDBox. Follow the section below on How to Restore Emails from MDBox.
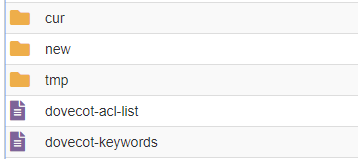
If you see folders named cur, new and tmp this email account is using MailDir. Follow the section below on How to Restore Emails from MailDir.
Note: This procedure restores all emails that were on the server for that email account at the specific time the backup was taken. This won't affect or delete any other emails currently on the account. If you had set up your email account using a POP mail client, the emails may have been received, downloaded onto your device and deleted from the server (as that's how POP works) in the time between 2 download points, meaning some emails may not have been backed up.
Step 1 - Log into CPanel and click on the R1Soft Restore Backups icon.
Sometimes when logging in via your Client Area or a Reseller account, you may get this screen. If so, simply enter the cPanel Details again.
Step 2 - Click on the orange folder icon to the right of the restore point you want to restore from.

Step 3 - Double click on Home.
Step 4 - Double click on mail.

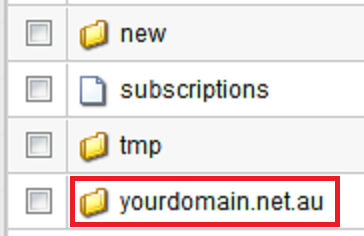
Step 5 - Double click on the domain name for the email account that you want to be restored.
Step 6 - Scroll up and click Restore Selected.
Step 7 - Click Restore to begin.
Step 8 - Once the restore is finished you can close the window.
If your email account is set up on an email program like your phone or Outlook, either hit the Send/Receive all emails button (most email clients should have a similar option). Some email clients are on a 15min timer where they check for new emails automatically. We'd recommend waiting for around an hour for the emails to finish syncing, especially if you were restoring a large amount.
MDBox is a way of storing multiple emails within a single file. Having emails stored in this format saves disk space and inodes for your cPanel account.
When restoring MDBox emails, you will need to restore the emails into a temporary email account and then forward emails into your primary email account. If you restored the email files on top of the original email account, any new emails that you might have received between the restore point and the time of the restore would be lost.
For this example, we will be restoring emails from admin@yourdomain.net.au into admin-restore@yourdomain.net.au.
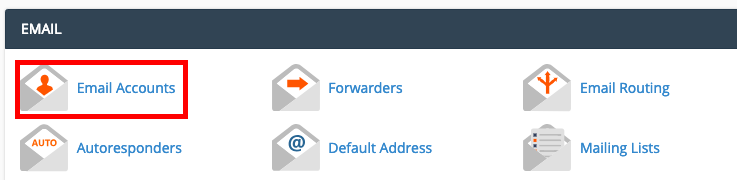
Step 1 - Log into cPanel and select Email Accounts.
Step 2 - Create a temporary email account to restore the emails into - for this example, we will be naming it admin-restore@yourdomain.net.au.


Step 3 - Open File Manager and navigate the temporary email folder. In this example, we will be going to the directory mail/yourdomain.net.au/admin-restore
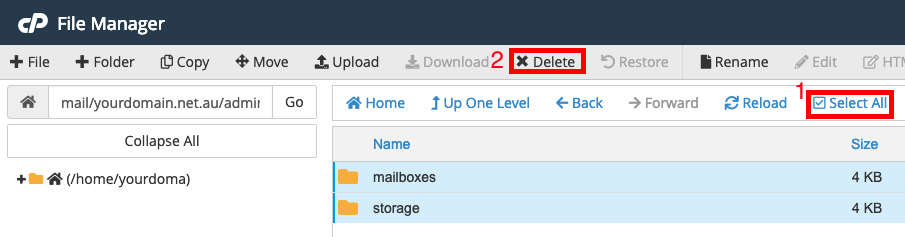
Step 4 - Select All, then Delete everything inside this temporary email folder. Do not delete the folder itself, or anything else in the File Manager.
Step 5 - From cPanel, click on R1Soft Restore Backups.
Sometimes when logging in via your Client Area or a Reseller account, you may get this screen. If so, simply enter the cPanel Details again.
Step 6 - Click on the Browse icon on the date that you wish to restore from - in this example, we will be restoring from February 27 9pm.

Step 7 - Navigate to the mail folder of the domain you wish to restore from (home/mail/<domain>/) - in this example, we will be navigating to home/mail/yourdomain.net.au.
(To navigate, double click on the folder)
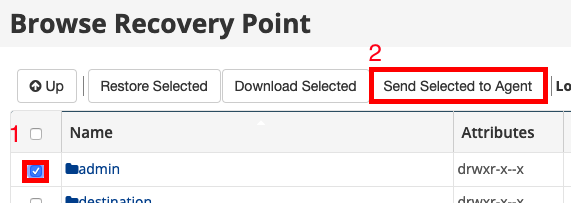
Step 8 - Select the Email Account on the right hand side and click on Send Selected to Agent.
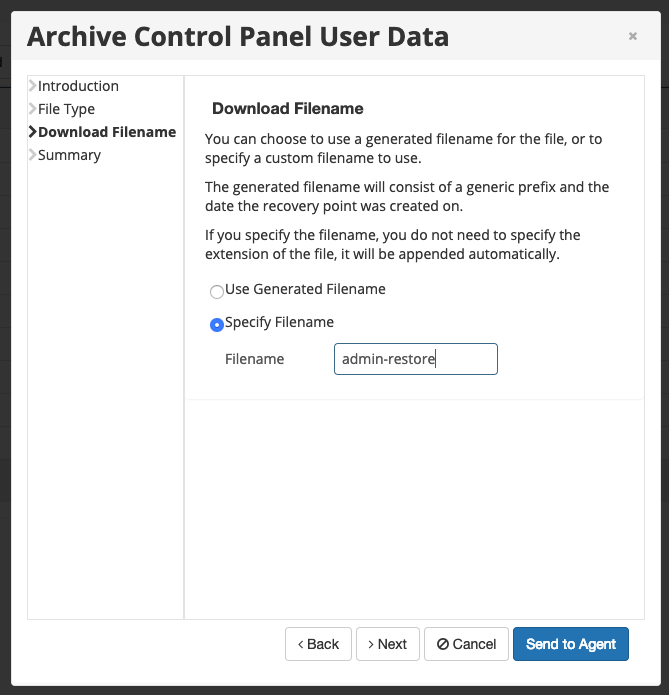
Step 9 - Specify a Filename and then click on Send to Agent - in this example, we will be using admin-restore.
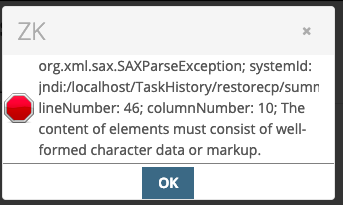
If you receive an error, it is fine to ignore it. Click the 'X' option.
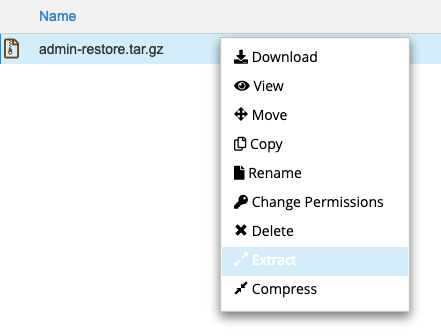
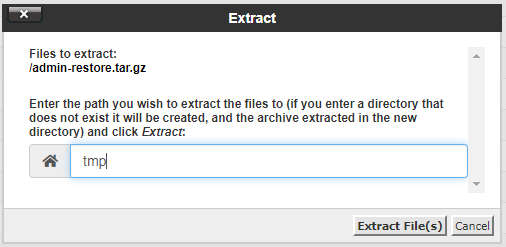
Step 10 - Open up File Manager in cPanel. The file will be created in the home directory. Right click on the file (Ctrl+Click on Mac) and extract the restored tar.gz file to the tmp folder.
Simply enter 'tmp' in the box, which will extract it to the '/home/yourdoma/tmp/' directory.
Step 11 - Navigate to the extracted files - in this example, we will be going to tmp/home/yourdoma/mail/yourdomain.net.au/admin. In practical terms, this step involves clicking on the 'tmp' folder in the file manager's home directory. From there, click on the 'home' folder, etc.
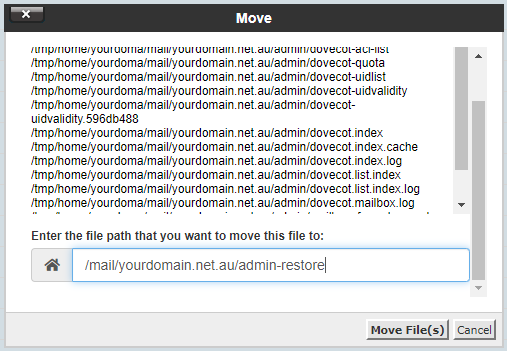
Step 12 - Select All in the admin folder and then click Move.
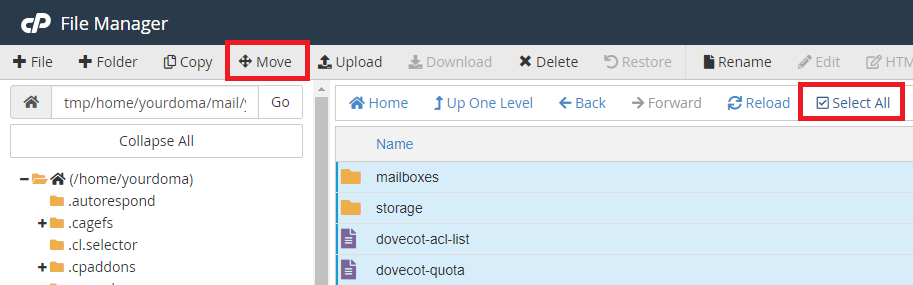
Step 13 - Specify the file path of your temporary email account folder - in this example, we will be using /mail/yourdomain.net.au/admin-restore.
Note: If unsure, replace 'yourdoma' with your cPanel username, replace 'yourdomain.net.au' with your domain, and replace 'admin-restore' with the name of your temporary email account from Step 2.
Step 14 - Go back to your cPanel home page and select Email Accounts.
Step 15 - Click on Access Webmail for the temporary email account. Once you are inside Webmail, you can use this as a normal email account. We recommend forwarding any important emails to your primary email address.

Step 16 (OPTIONAL) - Delete the temporary email account once you have finished recovering emails.

- 15-08-2018 14:01
How to restore Files, Databases and Emails using the R1soft automated backup in cPanel
Note: If you would like, we would charge a one-time fee of $40 to perform this service on your behalf. To request this, just submit a support ticket through your Client Area and let us know:
Specify which domain you would like to have restored, how far back you'd like it restored from, and what you'd like restored (e.g. site files and database)
We take backups every 8 hours and store these for a week. To find the exact restore points available, you can follow the first few steps of this guide to log into your R1Soft backup management area.
How to Restore Files
Step 1 - Log into the CPanel account (guide here).
Step 2 - Click on File Manager.
Step 3 - Find the public_html directory and rename it to 'public_html.old-currentdate' or similar.
Note: The R1Soft backup restore software overwrites all files, even if the content was different. However it does not remove files that were not present at the time of the backup. By effectively removing the entire directory we are ensuring that the files are restored exactly how they were at the time the backup was taken.
As long as there are no files in the public_html directory, your website will display a 404 error. Bear this in mind when performing a website restore.
Step 4 - Create a new public_html folder. This will make the restored files go into a clean folder.
(1) Click on +Folder.
(2) Type public_html.
(3) Leave the second field blank.
(4) Click Create New Folder.
Step 5 - Click on the cP button in the top left of the page to go back to the main page of cPanel.
Step 6 - Click on the R1Soft Restore Backups icon.
Sometimes when logging in via your Client Area or a Reseller account, you may get this screen. If so, simply enter the cPanel Details again.
Step 7 - R1Soft will now open, and the dates and times of available backups will be listed under “Created On”. Click on the Folder icon next to the date you wish to restore.
Step 8 - Double click on the Home folder.
Step 9 - Check the box next to the folder you wish to restore. For a full website restore, select the public_html folder.
Step 10 - Scroll up and click Restore Selected.
Step 11 - Click Restore to begin.
Step 12 - Once the restore is finished you can close the window.
Note: You may get some errors under Files Failed. It's often OK to get a few of these, as they're just cache files which aren't needed when restoring website data
Once the restore is complete, we'd recommend testing your website in a non-cached browser. If the site still shows errors, you may need to restore the database as well.
How to Restore Database Data
Step 1 - Log into the CPanel account (guide here).
Step 2 - Click on the R1Soft Restore Backups icon.
Sometimes when logging in via your Client Area or a Reseller account, you may get this screen. If so, simply enter the cPanel Details again.
Step 3 - Click on the Database icon next to the date you wish to restore.
Step 4 - Clicking the arrow symbol next to Databases will display a list of all the backed up databases, then tick the box next to the database you wish to restore. If you see multiple databases and don't know which is the right one, click here for our guide on finding the database name.
If restoring a deleted database, the database will need to be created in cPanel with the same name in the cPanel Databases utility, or else it will not appear in R1soft.
Step 5 - Click Restore Selected.
The database will now begin restoring. Close the window once the restore is complete.
How to Restore Emails
These are advanced guides and may take some time to complete. Before starting, please check if your emails are in MDBox or MailDir format, because the restore process is different.
Note: If the email account was deleted from cPanel, you'll first have to create it again from the Email Accounts tool in cPanel.
Identifying an MDBox or MailDir Email Account
Step 1 - Log into CPanel and navigate to File Manager.
Step 2 - Navigate to mail/<yourdomain name>/<email account name>. In this example, we will be using admin@yourdomain.net.au, therefore we will go to the directory mail/yourdomain.net.au/admin.
Once you are there, if you see folders named mailboxes and storage, then the email format is MDBox. Follow the section below on How to Restore Emails from MDBox.
If you see folders named cur, new and tmp this email account is using MailDir. Follow the section below on How to Restore Emails from MailDir.
How to restore emails from MailDir
Note: This procedure restores all emails that were on the server for that email account at the specific time the backup was taken. This won't affect or delete any other emails currently on the account. If you had set up your email account using a POP mail client, the emails may have been received, downloaded onto your device and deleted from the server (as that's how POP works) in the time between 2 download points, meaning some emails may not have been backed up.
Step 1 - Log into CPanel and click on the R1Soft Restore Backups icon.
Sometimes when logging in via your Client Area or a Reseller account, you may get this screen. If so, simply enter the cPanel Details again.
Step 2 - Click on the orange folder icon to the right of the restore point you want to restore from.
Step 3 - Double click on Home.
Step 4 - Double click on mail.
Step 5 - Double click on the domain name for the email account that you want to be restored.
Step 6 - Scroll up and click Restore Selected.
Step 7 - Click Restore to begin.
Step 8 - Once the restore is finished you can close the window.
If your email account is set up on an email program like your phone or Outlook, either hit the Send/Receive all emails button (most email clients should have a similar option). Some email clients are on a 15min timer where they check for new emails automatically. We'd recommend waiting for around an hour for the emails to finish syncing, especially if you were restoring a large amount.
How to restore emails from MDBox
MDBox is a way of storing multiple emails within a single file. Having emails stored in this format saves disk space and inodes for your cPanel account.
When restoring MDBox emails, you will need to restore the emails into a temporary email account and then forward emails into your primary email account. If you restored the email files on top of the original email account, any new emails that you might have received between the restore point and the time of the restore would be lost.
For this example, we will be restoring emails from admin@yourdomain.net.au into admin-restore@yourdomain.net.au.
Step 1 - Log into cPanel and select Email Accounts.
Step 2 - Create a temporary email account to restore the emails into - for this example, we will be naming it admin-restore@yourdomain.net.au.
Step 3 - Open File Manager and navigate the temporary email folder. In this example, we will be going to the directory mail/yourdomain.net.au/admin-restore
Step 4 - Select All, then Delete everything inside this temporary email folder. Do not delete the folder itself, or anything else in the File Manager.
Step 5 - From cPanel, click on R1Soft Restore Backups.
Sometimes when logging in via your Client Area or a Reseller account, you may get this screen. If so, simply enter the cPanel Details again.
Step 6 - Click on the Browse icon on the date that you wish to restore from - in this example, we will be restoring from February 27 9pm.
Step 7 - Navigate to the mail folder of the domain you wish to restore from (home/mail/<domain>/) - in this example, we will be navigating to home/mail/yourdomain.net.au.
(To navigate, double click on the folder)
Step 8 - Select the Email Account on the right hand side and click on Send Selected to Agent.
Step 9 - Specify a Filename and then click on Send to Agent - in this example, we will be using admin-restore.
If you receive an error, it is fine to ignore it. Click the 'X' option.
Step 10 - Open up File Manager in cPanel. The file will be created in the home directory. Right click on the file (Ctrl+Click on Mac) and extract the restored tar.gz file to the tmp folder.
Simply enter 'tmp' in the box, which will extract it to the '/home/yourdoma/tmp/' directory.
Step 11 - Navigate to the extracted files - in this example, we will be going to tmp/home/yourdoma/mail/yourdomain.net.au/admin. In practical terms, this step involves clicking on the 'tmp' folder in the file manager's home directory. From there, click on the 'home' folder, etc.
Step 12 - Select All in the admin folder and then click Move.
Step 13 - Specify the file path of your temporary email account folder - in this example, we will be using /mail/yourdomain.net.au/admin-restore.
Note: If unsure, replace 'yourdoma' with your cPanel username, replace 'yourdomain.net.au' with your domain, and replace 'admin-restore' with the name of your temporary email account from Step 2.
Step 14 - Go back to your cPanel home page and select Email Accounts.
Step 15 - Click on Access Webmail for the temporary email account. Once you are inside Webmail, you can use this as a normal email account. We recommend forwarding any important emails to your primary email address.
Step 16 (OPTIONAL) - Delete the temporary email account once you have finished recovering emails.
Thank you for your feedback on this article.
Related Articles
© Crucial