How to Preview Your Website Before Changing DNS
Print
Your hosts entry will consist of the IP address of the server, and the domain name(s) you wish to load from that IP.
For example:
101.0.112.154 yourdomain.net.au www.yourdomain.net.au
You can find your server IP in the email sent to you when you signed up with us, which contains your Hosting account login details.
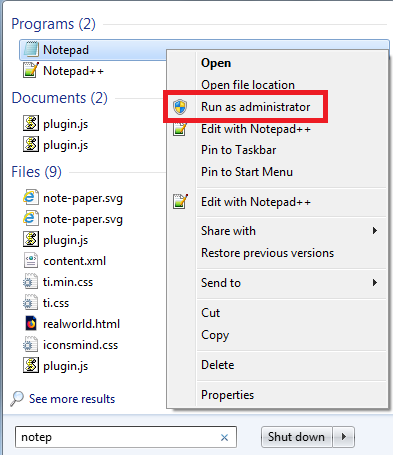
Step 1 - Click Start, Type in Notepad then right click and select Run as Administrator. Click Continue on the 'Windows needs your permission' popup.

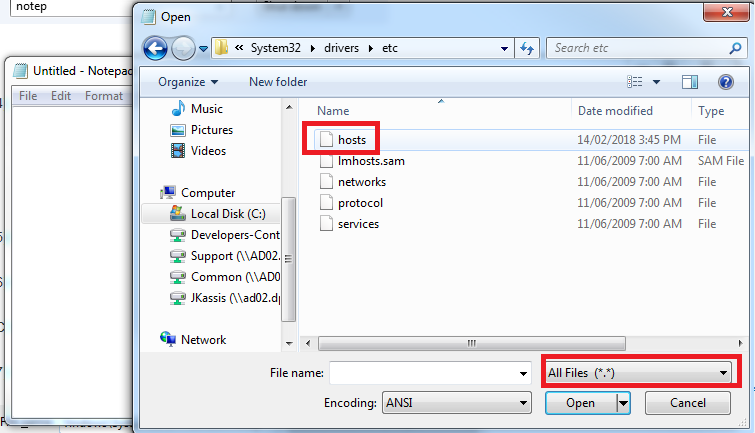
Step 2 - In Notepad, click File > Open, go to the C:\Windows\System32\Drivers\etc\ folder, click the box above Cancel and select All Files then click the hosts file and click Open

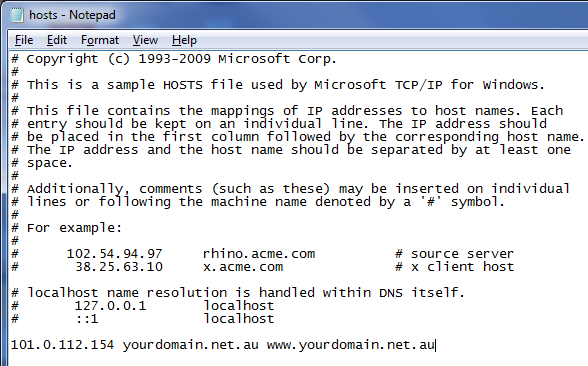
Step 3 - Start a new line at the bottom of the file and enter the new entry, i.e.
101.0.112.154 yourdomain.net.au www.yourdomain.net.au

Step 4 - Save the file by going to File > Save in Notepad.
Note: You can disable this hosts file entry once it is no longer needed by repeating steps 1 and 2, and adding a # to the start of the line you added. You could also delete the line from the hosts file entirely. Remember to save your changes.
Step 1 - Open the Terminal program (under Applications > Utilities).
Step 2 - Type in the following code: sudo nano /private/etc/hosts
Then type your password in if asked.

Step 3 - Start a new line at the bottom of the file, and add the hosts entry, for example:
101.0.112.154 yourdomain.net.au www.yourdomain.net.au

Step 4 - When finished, hit Control+O followed by Enter/Return to save changes, then hit Control+X to exit out of editing the hosts file.
Step 5 - Type in the command below into Terminal:
dscacheutil -flushcache
Step 6 - Hit Enter/Return.
Step 7 - Close the terminal.
Note: You can disable this hosts file entry once it is no longer needed by repeating steps 1 and 2, and adding a # to the start of the line you added. You could also delete the line from the hosts file entirely. Remember to save your changes.
- 26-03-2018 16:53
How to Preview Your Website Before Changing DNS
Previewing your website after migration before changing DNS and making it go live is a recommended precaution to avoiding downtime; there are different methods to this varying in complexity. For simply viewing your website to verify functionality the temporary proxy link method is quick and easy, if full website functionality is required for rigorous testing or web development then the hosts file method is required.Temporary Proxy Link Method:
There are certain web services such as https://www.skipdns.link/ that will allow you to input a domain and an IP, then give you a temporary link through their proxy you can view the site through. This is useful for verifying content but not for web development, for pre-DNS web development you would need to use the Hosts File method below.Hosts File Method:
Editing your Hosts file is the best way to preview a website you're building while the website is hosted somewhere else. When a site is loaded using a browser, your computer will check in its Hosts file before doing a DNS lookup to find the correct server. This means that while other people will not see anything different, you can force your computer to load any domain from any server.Your hosts entry will consist of the IP address of the server, and the domain name(s) you wish to load from that IP.
For example:
101.0.112.154 yourdomain.net.au www.yourdomain.net.au
You can find your server IP in the email sent to you when you signed up with us, which contains your Hosting account login details.
How to Edit the Hosts File in Windows
Step 1 - Click Start, Type in Notepad then right click and select Run as Administrator. Click Continue on the 'Windows needs your permission' popup.
Step 2 - In Notepad, click File > Open, go to the C:\Windows\System32\Drivers\etc\ folder, click the box above Cancel and select All Files then click the hosts file and click Open
Step 3 - Start a new line at the bottom of the file and enter the new entry, i.e.
101.0.112.154 yourdomain.net.au www.yourdomain.net.au
Step 4 - Save the file by going to File > Save in Notepad.
Note: You can disable this hosts file entry once it is no longer needed by repeating steps 1 and 2, and adding a # to the start of the line you added. You could also delete the line from the hosts file entirely. Remember to save your changes.
How to Edit the Hosts File in Mac
Step 1 - Open the Terminal program (under Applications > Utilities).
Step 2 - Type in the following code: sudo nano /private/etc/hosts
Then type your password in if asked.

Step 3 - Start a new line at the bottom of the file, and add the hosts entry, for example:
101.0.112.154 yourdomain.net.au www.yourdomain.net.au

Step 4 - When finished, hit Control+O followed by Enter/Return to save changes, then hit Control+X to exit out of editing the hosts file.
Step 5 - Type in the command below into Terminal:
dscacheutil -flushcache
Step 6 - Hit Enter/Return.
Step 7 - Close the terminal.
Note: You can disable this hosts file entry once it is no longer needed by repeating steps 1 and 2, and adding a # to the start of the line you added. You could also delete the line from the hosts file entirely. Remember to save your changes.
Thank you for your feedback on this article.
Related Articles
© Crucial