How do I enable SPF and DKIM?
Print
Before you start, if you're on a Web Hosting, Reseller or Managed VPS plan make sure you're using our nameservers. Use ozdns.com.au to check, the first nameserver should be either nssyd01.crucial.com.au or nssyd01.aumanaged.com or nssyd01.clusterdns.net If you're on a VPS or Dedicated Server you should have your own nameservers set up.
SPF and DKIM are 2 features you can easily enable to make sure your emails go to their destination (instead of ending up in spam folders) and to reduce the amount of spam emails you receive. This article helps you set up an External SPF record is. For an explanation of what SPF and DKIM do, and how they work, click here.
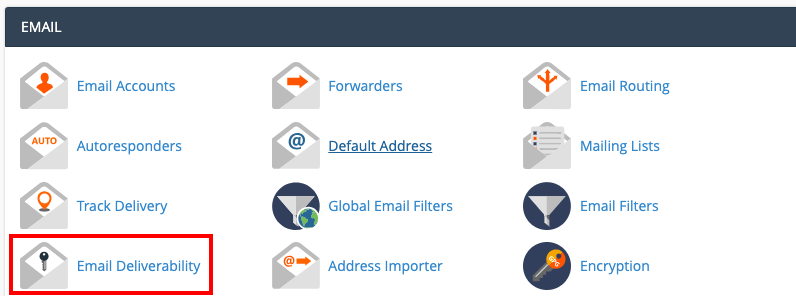
Step 1 - Login to your cPanel and click on Email Deliverability (if you do not have this, follow the next section below for Authentication).
Step 2 - Find the domain you want to enable SPF and DKIM for and click on MANAGE.

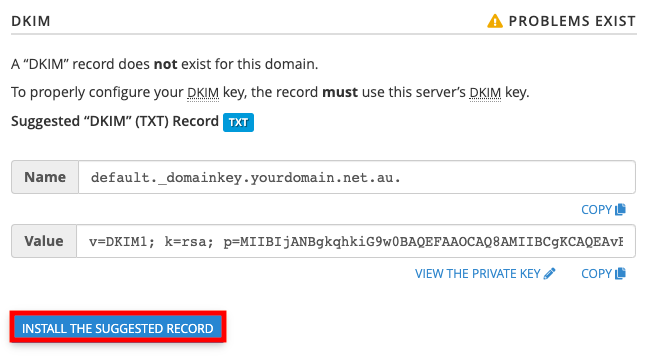
Step 3 - Underneath the heading DKIM, click on INSTALL THE SUGGESTED RECORD.
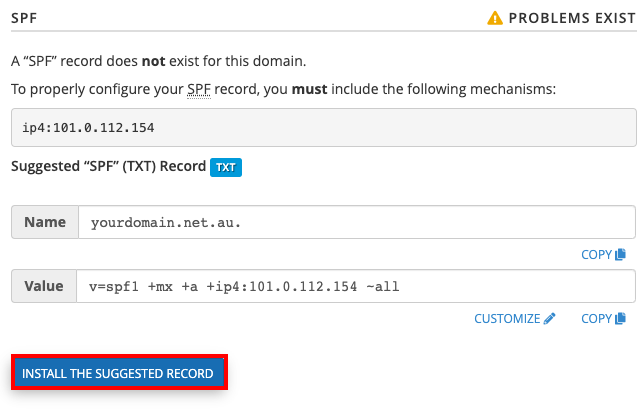
Step 4 - Same as the above, underneath the heading of SPF, click on INSTALL THE SUGGESTED RECORD.
Step 5 - After the SPF record is installed, underneath the heading of SPF again, click on CUSTOMIZE.
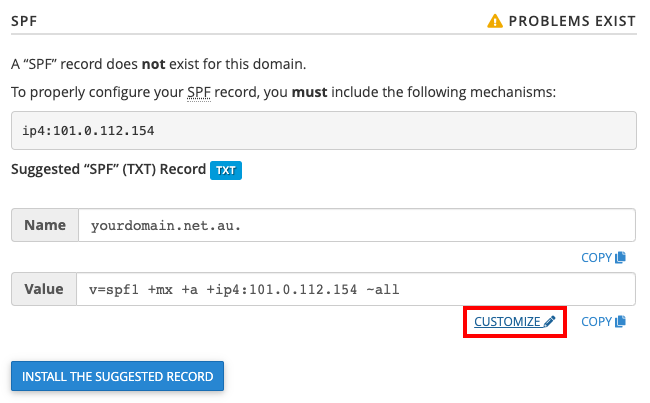
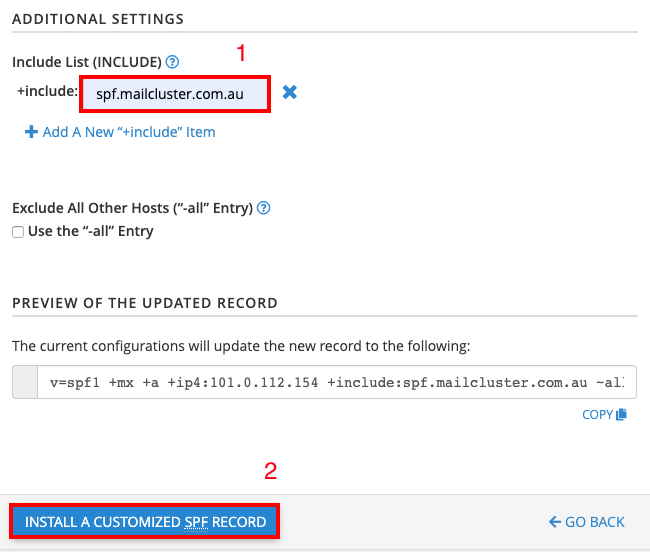
Step 6 - Under the heading ADDITIONAL SETTINGS, (1) include "spf.mailcluster.com.au" and then (2) click on INSTALL A CUSTOMIZED SPF RECORD.
Step 1 - Log in to cPanel (click here for a guide)
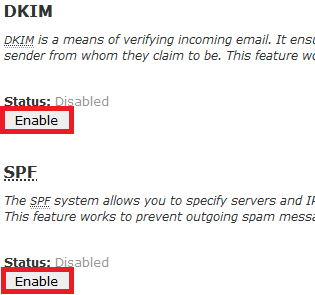
Step 2 - Click on the Authentication icon

Step 3 - Click Enable for both DKIM and SPF
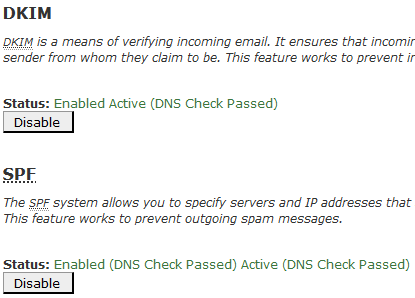
NOTE: If you get a warning or error initially, wait 15min and refresh the page by pressing f5 (windows) or command+f5 (mac)
Once enabled you will see the bellow screen. Note that if you're using a Crucial Web Hosting, Reseller or Managed VPS hosting service, this is not the final step.
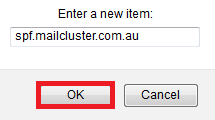
Step 4 - if you're using a Crucial Web Hosting, Reseller or Managed VPS hosting service for email, scroll down to find Include List (INCLUDE) and click on Add

Type spf.mailcluster.com.au and click OK
Now scroll down to the bottom of the page and click Update

Note: SPF records normally propagate and start working between 15min-4hrs after you update them, but in rare cases can take up to 24hrs.
Enable SPF and DKIM
Before you start, if you're on a Web Hosting, Reseller or Managed VPS plan make sure you're using our nameservers. Use ozdns.com.au to check, the first nameserver should be either nssyd01.crucial.com.au or nssyd01.aumanaged.com or nssyd01.clusterdns.net If you're on a VPS or Dedicated Server you should have your own nameservers set up.
SPF and DKIM are 2 features you can easily enable to make sure your emails go to their destination (instead of ending up in spam folders) and to reduce the amount of spam emails you receive. This article helps you set up an External SPF record is. For an explanation of what SPF and DKIM do, and how they work, click here.
How to enable SPF and DKIM
Step 1 - Login to your cPanel and click on Email Deliverability (if you do not have this, follow the next section below for Authentication).
Step 2 - Find the domain you want to enable SPF and DKIM for and click on MANAGE.
Step 3 - Underneath the heading DKIM, click on INSTALL THE SUGGESTED RECORD.
Step 4 - Same as the above, underneath the heading of SPF, click on INSTALL THE SUGGESTED RECORD.
Step 5 - After the SPF record is installed, underneath the heading of SPF again, click on CUSTOMIZE.
Step 6 - Under the heading ADDITIONAL SETTINGS, (1) include "spf.mailcluster.com.au" and then (2) click on INSTALL A CUSTOMIZED SPF RECORD.
How to enable SPF and DKIM Pre-cPanel 78
Step 1 - Log in to cPanel (click here for a guide)
Step 2 - Click on the Authentication icon
Step 3 - Click Enable for both DKIM and SPF
NOTE: If you get a warning or error initially, wait 15min and refresh the page by pressing f5 (windows) or command+f5 (mac)
Once enabled you will see the bellow screen. Note that if you're using a Crucial Web Hosting, Reseller or Managed VPS hosting service, this is not the final step.
Step 4 - if you're using a Crucial Web Hosting, Reseller or Managed VPS hosting service for email, scroll down to find Include List (INCLUDE) and click on Add
Type spf.mailcluster.com.au and click OK
Now scroll down to the bottom of the page and click Update
Note: SPF records normally propagate and start working between 15min-4hrs after you update them, but in rare cases can take up to 24hrs.
Thank you for your feedback on this article.
Related Articles
© Crucial