Add Or Edit A DMARC Record
Print
Step 1 - Login to cPanel and click on the Zone Editor icon
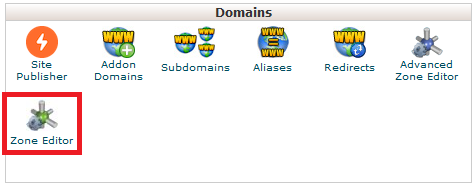
Then click Manage for the domain you want to add the DMARC to

Step 2 - Click +Add Record then Add DMARC Record
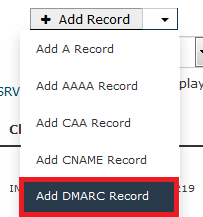
(1) Set the TTL to 900 (2) Select how you want the DMARC record to act
None: Treat failed SPF emails as normal
Quarantine: Send failed SPF emails to a SPAM/Junk folder
Reject: Reject failed SPF emails completely
(3) Click Add Record

How to Add An Advanced DMARC Record
Add a DMARC record as you would in the Basic guide above, but instead of clicking Add Record, click Optional Parameters first. Once DMAR configuration is complete, click Add Record.

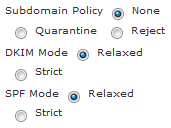
Subdomain Policy: Set how the DMARC record applies to email accounts with subdomains
DKIM and SPF mode: Setting either of these to Relaxed will allow the DKIM/SPF of a subdomain to pass the check if the DKIM/SPF record is for a different subdomain of the primary domain (or the primary domain itself). Setting to Strict means that the DKIM/SPF must match the exact DKIM/SPF of the specific subdomain
Percentage: Sets the percentage of emails which DMARC will check. It's best to leave this at 100.

Generate Failure Reports When: Sets which emails are included in the DMARC failed emails. Select All Checks to only include emails that fail all SPF/DKIM checks. Select Any Check to include emails that fail some, but pass other of the checks
Report Format: It's best to select ARFR here as it has been specifically designed for DMARC reports

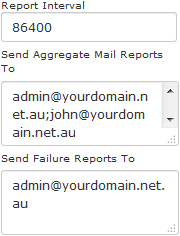
Report Interval: Sets how often a report is sent (86400 seconds is default, which is 24hrs)
Send Aggregate Mail Reports To: Set which email accounts recieve complete DMARC reports (including success, failurs and partial failures)
Send Failure Reports To: Set which email accounts recieve reports of emails which failed DMARC
Step 1 - Login to cPanel and click on the Zone Editor icon

Then click Manage for the domain you want to add the DMARC to

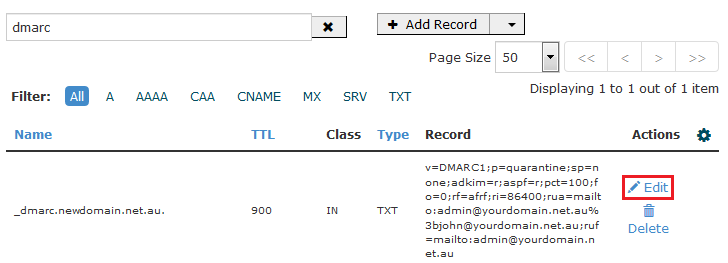
Find the DMARC record (search dmarc lower case) and click Edit
You can edit the basic policy and also use the Optional Parameters menu to edit advanced options. Click Save Record to save the changes.

HOW TO ADD A DMARC RECORD
This article helps you set up a DMARC record is. For an explaination of what DMARC does and how it works, click here. Before you add a DMARC record make sure you have enabled SPF and DKIM. Click here for a guide on doing that.How to Access the DMARC Tool in cPanel
Step 1 - Login to cPanel and click on the Zone Editor icon
Then click Manage for the domain you want to add the DMARC to
Step 2 - Click +Add Record then Add DMARC Record
How To Add A Basic DMARC Record
(1) Set the TTL to 900 (2) Select how you want the DMARC record to act
None: Treat failed SPF emails as normal
Quarantine: Send failed SPF emails to a SPAM/Junk folder
Reject: Reject failed SPF emails completely
(3) Click Add Record
How to Add An Advanced DMARC Record
Add a DMARC record as you would in the Basic guide above, but instead of clicking Add Record, click Optional Parameters first. Once DMAR configuration is complete, click Add Record.
Subdomain Policy: Set how the DMARC record applies to email accounts with subdomains
DKIM and SPF mode: Setting either of these to Relaxed will allow the DKIM/SPF of a subdomain to pass the check if the DKIM/SPF record is for a different subdomain of the primary domain (or the primary domain itself). Setting to Strict means that the DKIM/SPF must match the exact DKIM/SPF of the specific subdomain
Percentage: Sets the percentage of emails which DMARC will check. It's best to leave this at 100.
Generate Failure Reports When: Sets which emails are included in the DMARC failed emails. Select All Checks to only include emails that fail all SPF/DKIM checks. Select Any Check to include emails that fail some, but pass other of the checks
Report Format: It's best to select ARFR here as it has been specifically designed for DMARC reports
Report Interval: Sets how often a report is sent (86400 seconds is default, which is 24hrs)
Send Aggregate Mail Reports To: Set which email accounts recieve complete DMARC reports (including success, failurs and partial failures)
Send Failure Reports To: Set which email accounts recieve reports of emails which failed DMARC
How To Edit A DMARC Record
Step 1 - Login to cPanel and click on the Zone Editor icon
Then click Manage for the domain you want to add the DMARC to
Find the DMARC record (search dmarc lower case) and click Edit
You can edit the basic policy and also use the Optional Parameters menu to edit advanced options. Click Save Record to save the changes.
Related Articles
© Crucial