How can I create a Wordpress staging sub-domain?
Print
NOTE: Please have a sub-domain created for where you want to host the staging site. (Guide here)
NOTE: This is an advanced guide and requires following all the steps carefully. Try to set at least 1hr to complete this process fully.
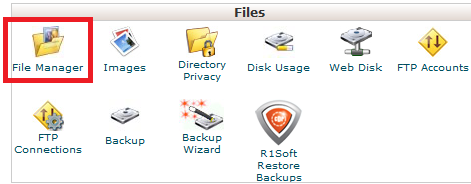
Step 1 - Log into cPanel (click here for a guide) and open the File Manager
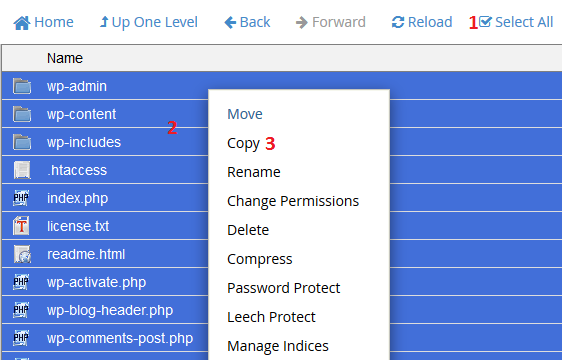
Step 2 - First we need to move files from the public_html folder (or the folder that is currently hosting the live website) to the sub-domain folder. Find and go into your website folder then (1) click on Select All (2) right-click (Windows) or control+click (Mac) anywhere on the highlighted area and (3) click Copy
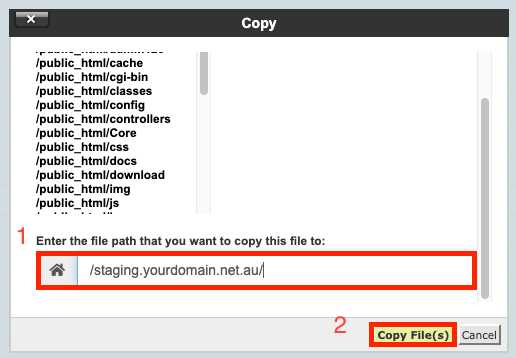
Now (1) change the folder to /<sub-domain-directory/ and (2) click Copy Files. (in this example, we will be using /staging.yourdomain.net.au/ as the staging subdomain)
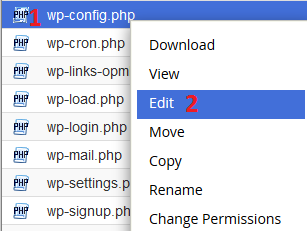
Step 3 - Go into the sub-domain folder and (1) Find the wp-config.php file and right-click (Windows) or command+click (Mac) then (2) click on Edit.
Find the lines relating to the MySQL database username, password
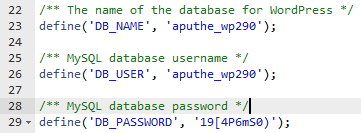
Step 5 - Keep the page with the wp-config file open. Open a new cPanel Window and use the MySQL Database Wizard to make a new database and user. Click here for a guide on how to do this. Make sure that you write down the newly created database name, username and password somewhere on your computer, like in a notepad or text document.
Step 6 - Go back to the wp-config.php file in Edit mode. Now you need to edit the database details.
If, for example, you set up a database with the following details:
Database Name: aputhe_wp01
User: aputhe_admin
Password: Password123!!!
Then your wp-config.php file will look like this:
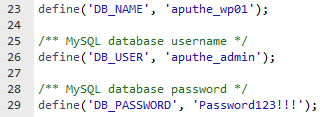
Make sure to hit Save Changes to update the new database details.

Step 7 - Now you need to do 2 things:
A) Export the database .sql file from the old database
B) Import the .sql file into the newly created database
Make sure to check the wp-config file for the correct name of the old database. Click here for our guide on importing a database using the cPanel tool PHPMyAdmin.
Step 8 - Next you need to do is update the domain name (from, for example, yourdomain.net.au to staging.yourdomain.net.au). Click here for a guide on doing that. Note that the login to the admin section has changed. If you previously accessed the admin panel using, for example, yourdomain.net.au/wp-admin the new link will be staging.yourdomain.net.au/wp-admin (try /wp-login.php if you get an error when going to wp-admin)
That's all done now! If you completed all the steps correctly, the WordPress site should now be working from the sub-domain for staging.
- 03-05-2019 14:55
How can I create a Wordpress staging sub-domain?
NOTE: Please have a sub-domain created for where you want to host the staging site. (Guide here)
NOTE: This is an advanced guide and requires following all the steps carefully. Try to set at least 1hr to complete this process fully.
Step 1 - Log into cPanel (click here for a guide) and open the File Manager

Step 2 - First we need to move files from the public_html folder (or the folder that is currently hosting the live website) to the sub-domain folder. Find and go into your website folder then (1) click on Select All (2) right-click (Windows) or control+click (Mac) anywhere on the highlighted area and (3) click Copy

Now (1) change the folder to /<sub-domain-directory/ and (2) click Copy Files. (in this example, we will be using /staging.yourdomain.net.au/ as the staging subdomain)
Step 3 - Go into the sub-domain folder and (1) Find the wp-config.php file and right-click (Windows) or command+click (Mac) then (2) click on Edit.

Find the lines relating to the MySQL database username, password

Step 5 - Keep the page with the wp-config file open. Open a new cPanel Window and use the MySQL Database Wizard to make a new database and user. Click here for a guide on how to do this. Make sure that you write down the newly created database name, username and password somewhere on your computer, like in a notepad or text document.
Step 6 - Go back to the wp-config.php file in Edit mode. Now you need to edit the database details.
If, for example, you set up a database with the following details:
Database Name: aputhe_wp01
User: aputhe_admin
Password: Password123!!!
Then your wp-config.php file will look like this:

Make sure to hit Save Changes to update the new database details.

Step 7 - Now you need to do 2 things:
A) Export the database .sql file from the old database
B) Import the .sql file into the newly created database
Make sure to check the wp-config file for the correct name of the old database. Click here for our guide on importing a database using the cPanel tool PHPMyAdmin.
Step 8 - Next you need to do is update the domain name (from, for example, yourdomain.net.au to staging.yourdomain.net.au). Click here for a guide on doing that. Note that the login to the admin section has changed. If you previously accessed the admin panel using, for example, yourdomain.net.au/wp-admin the new link will be staging.yourdomain.net.au/wp-admin (try /wp-login.php if you get an error when going to wp-admin)
That's all done now! If you completed all the steps correctly, the WordPress site should now be working from the sub-domain for staging.
Related Articles
© Crucial