Email Backup / Archive Guide
Print
Backup Guides
Backups are intended for making a full copy of your email inbox (including sent, draft, and other folders) into a single backup file which can be stored in another location securely (like Google Drive, Dropbox or a USB drive).
Step 1 - Select File in the top left.
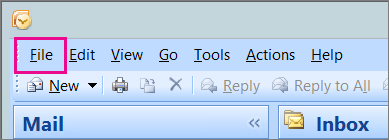
Step 2 - Select Import and Export.
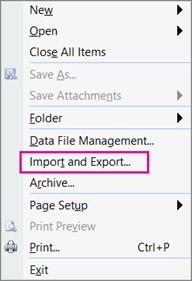
Step 3 - Select Export to a file, and then click Next.
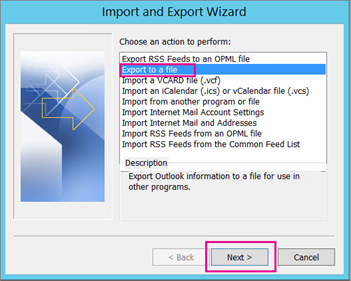
Step 4 - Click Personal File Folder (.pst), and then click Next.
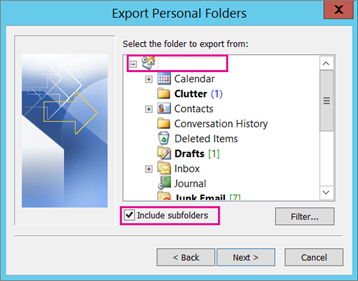
Step 5 - Select the name of the email account to export, as shown in the picture below. Only information for one account can be exported information at a time. Make sure that the Include subfolders check box is selected. This way everything in the account will be exported: Calendar, Contacts, and Inbox. Choose Next.
Step 6 - Click Browse to select where you want to save the Outlook Data File (.pst) and to enter a file name. Click OK to continue.
Note: If you have previously used the export feature, the previous folder location and file name appear. Make sure that you change the file name if you want to create a new file instead of using the existing file.
Step 7 - If you are exporting to an existing Outlook Data File (.pst), under Options, specify what to do when exporting items that already exist in the file.
Step 8 - Click Finish.
Step 9 - The export begins immediately, unless you're creating a new Outlook Data File (.pst) or you're exporting it to an existing .pst file that is password protected. In those cases you'll get this dialog box:
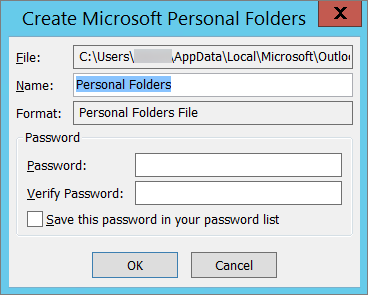
Choose OK if you don't want to password protect your file. Otherwise, enter the password you'd like to set in the Password and Verify Password boxes, and then click OK. In the Outlook Data File Password dialog box, enter the password, and then click OK. If you are exporting to an existing Personal File Folder (.pst) that is password protected, in the Outlook Data File Password dialog box, enter the password, and then click OK.
Now that your Outlook data is in a .pst file, it's portable. For example, you can save the .pst file to OneDrive, and then download it to your new computer. Or you can save it to a usb flash drive, plug the drive into your new computer, and then import your email, contacts, and calendar to Outlook.
Step 1 - Click File in the top left.
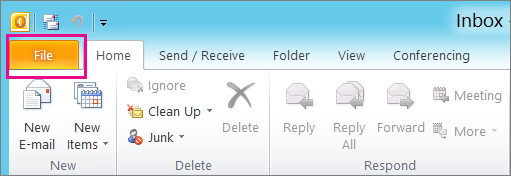
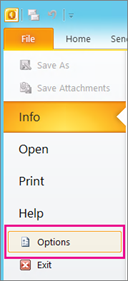
Step 2 - Choose Options.
Step 3 - In the Outlook Options box, choose Advanced.
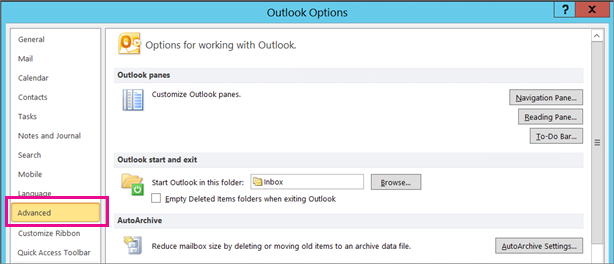
Step 4 - Under the Export section, choose Export.

Step 5 - Click Export to a file, and then click Next.
Step 6 - Click Outlook Data File (.pst), and then click Next.
Step 7 - Select the name of the email account to export, as shown in the picture below. Only information for one account can be exported information at a time. Make sure that the Include subfolders check box is selected. Select Next.
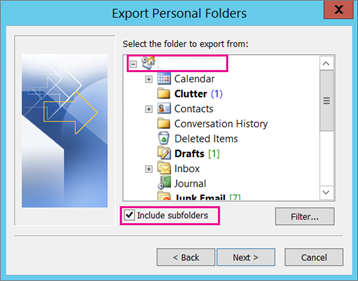
Step 8 - Click Browse to select where you want to save the Outlook Data File (.pst) and to enter a file name. Click OK to continue. Note: If you have previously used the export feature, the previous folder location and file name appear. Make sure that you change the file name if you want to create a new file instead of using the existing file.
Step 9 - If you are exporting to an existing Outlook Data File (.pst), under Options, specify what to do when exporting items that already exist in the file.
Step 10 - Click Finish.The export begins immediately, unless you're creating a new Outlook Data File (.pst) or you're exporting it to an existing .pst file that is password protected. In those cases you'll get this dialog box:

Choose OK if you don't want to password protect your file. Otherwise, enter the password you'd like to set in the Password and Verify Password boxes, and then click OK. In the Outlook Data File Password dialog box, enter the password, and then click OK. If you are exporting to an existing Personal File Folder (.pst) that is password protected, in the Outlook Data File Password dialog box, enter the password, and then click OK.
Now that your Outlook data is in a .pst file, it's portable. For example, you can save the .pst file to OneDrive, and then download it to your new computer. Or you can save it to a usb flash drive, plug the drive into your new computer, and then import your email, contacts, and calendar to Outlook.
Step 1 - Open Outlook and click on File in the top left.

Step 2 - Click on Open & Export > Import/Export.
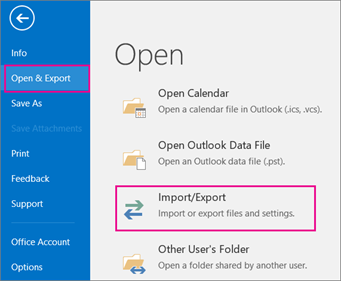
Step 3 - Select Export to a file.
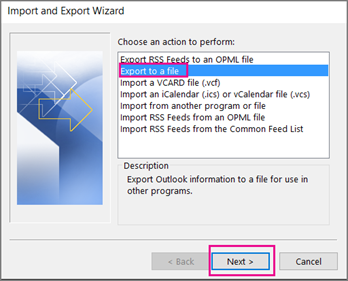
Step 4 - Select Outlook Data File (.pts) and click Next.
Step 5 - Select the name of the email account to export, as shown in the picture below. Only information for one account can be exported at a time. Make sure that the Include subfolders check box is selected. Select Next.
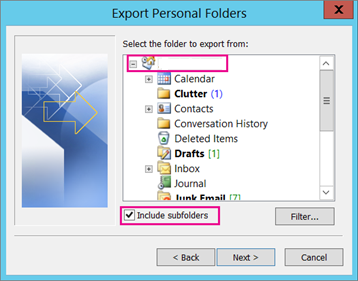
Step 6 - Click Browse to select where to save the Outlook Data File (.pst). Type a file name, and then click OK to continue.
Note: If you’ve used export before, the previous folder location and file name appear. Type a different file name before clicking OK.
Step 7 - If you are exporting to an existing Outlook Data File (.pst), under Options, specify what to do when exporting items that already exist in the file.
Step 8 - Click Finish.
Thunderbird has no inbuilt way to Import/Export emails, but you can easily find an Import/Export extension online and install it. Mozilla recommends this tool, but you can also save emails or group of emails manually as below:
Step 1 - Select the emails that you wish to back up. You can hold Ctrl and click to select multiple emails, or press Ctrl + A to select all emails in the current folder.
Step 2 - Right-click on one of the selected emails and select Save As.
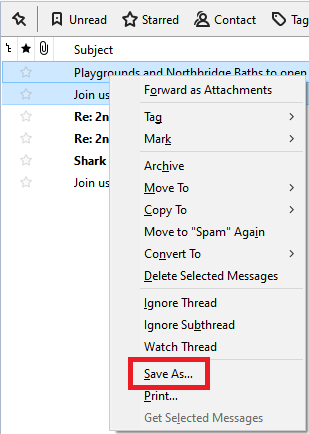
This will create a .eml file which you can use to import your mail elsewhere. This Mozilla support article may also be of some help.
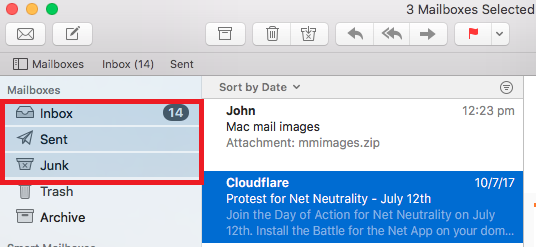
Step 1 - Press Shift + Mouse Click to select all the folders you want to back up.
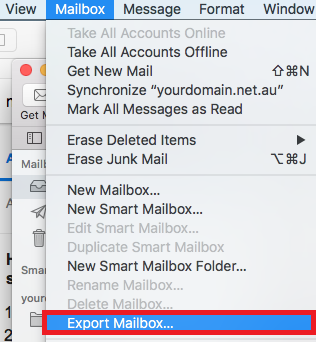
Step 2 - Click on Mailbox > Export Mailbox.
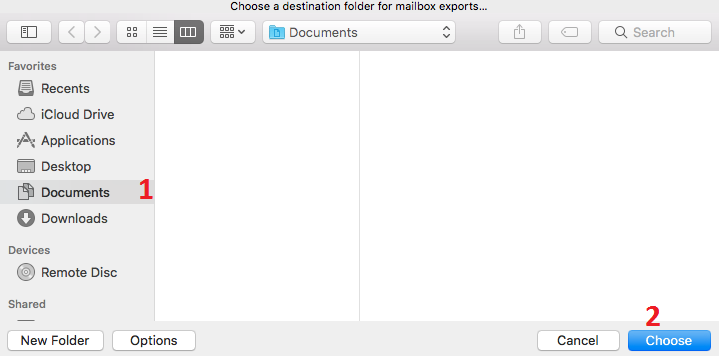
Step 3 - (1) Select the folder you want to save the backup in to (2) Click Choose.
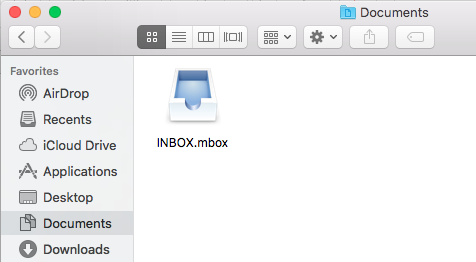
Step 4 - Once saved, you'll see the backup file on your computer. You can store this file in another location for safekeeping.
Email Archives are intended for reducing the size of an IMAP inbox. These will backup emails in a specified range (e.g. All emails older than 1yr) and save them into a single backup file on your computer. They are then automatically removed from your inbox and the server to save space.
Step 1 - Click on File > Info > Cleanup Tools > Archive.
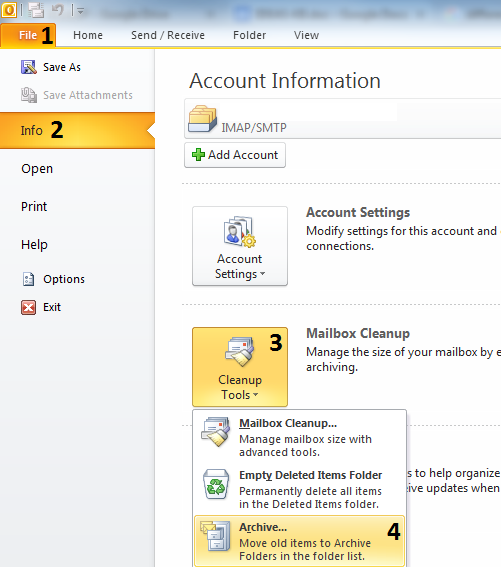
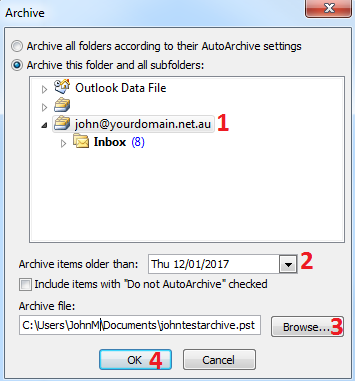
Step 2 - Select:
(1) The Email Account you want archived.
(2) The date the archive should go back from.
(3) The directory the archive file should be saved to.
(4) Click OK once done.
Once this completes, an archive PST file will appear in the chosen folder on your computer.
Note: Once your emails are archived, you can safely delete them from your IMAP email account or Webmail. However, if your emails are important to your business, before you do this it's highly recommended you make 2 backups of your emails, one to a separate hard drive/USB, and another to an online storage service like Google Drive or Dropbox.
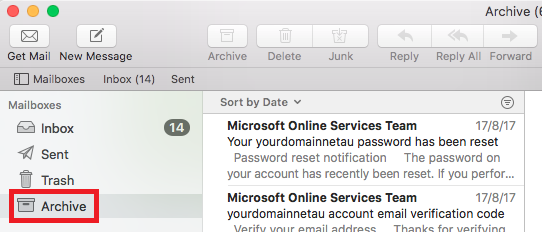
Step 1 - Select all the emails you want to archive then click the Archive button.
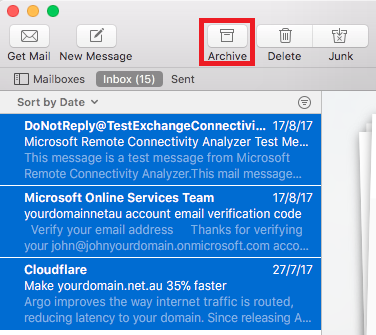
Step 2 -The emails will be moved to the Archive folder.
Step 1 - Select the emails that you wish to add to your Archive. You can hold Ctrl and click to select multiple emails, or press Ctrl + A to select all emails in the current folder.
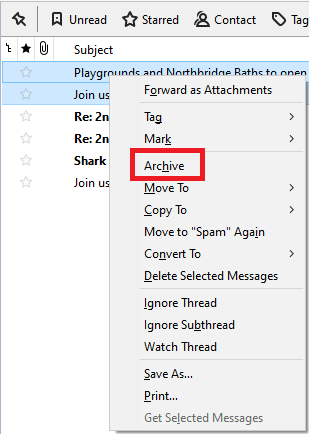
Step 2 - Right-click on one of the selected emails and select Archive.
Step 3 - The emails will be moved to an Archive folder in Thunderbird.
- 07-09-2018 10:02
Email Backup / Archive Guide
Note: cPanel doesn't include a feature to backup or archive emails. You will need to do this through your email client, preferably on a computer rather than a Smartphone or Tablet. We can provide general information, however functionality of email clients is outside of our support scope. If in doubt, please consult your IT team. If your email program isn't listed here, you can easily find guides by googling, for example, "Outlook 2016 email backup guide".Backup Guides
Backups are intended for making a full copy of your email inbox (including sent, draft, and other folders) into a single backup file which can be stored in another location securely (like Google Drive, Dropbox or a USB drive).
Outlook 2007
Step 1 - Select File in the top left.

Step 2 - Select Import and Export.

Step 3 - Select Export to a file, and then click Next.

Step 4 - Click Personal File Folder (.pst), and then click Next.
Step 5 - Select the name of the email account to export, as shown in the picture below. Only information for one account can be exported information at a time. Make sure that the Include subfolders check box is selected. This way everything in the account will be exported: Calendar, Contacts, and Inbox. Choose Next.
Step 6 - Click Browse to select where you want to save the Outlook Data File (.pst) and to enter a file name. Click OK to continue.
Note: If you have previously used the export feature, the previous folder location and file name appear. Make sure that you change the file name if you want to create a new file instead of using the existing file.
Step 7 - If you are exporting to an existing Outlook Data File (.pst), under Options, specify what to do when exporting items that already exist in the file.
Step 8 - Click Finish.
Step 9 - The export begins immediately, unless you're creating a new Outlook Data File (.pst) or you're exporting it to an existing .pst file that is password protected. In those cases you'll get this dialog box:

Choose OK if you don't want to password protect your file. Otherwise, enter the password you'd like to set in the Password and Verify Password boxes, and then click OK. In the Outlook Data File Password dialog box, enter the password, and then click OK. If you are exporting to an existing Personal File Folder (.pst) that is password protected, in the Outlook Data File Password dialog box, enter the password, and then click OK.
Now that your Outlook data is in a .pst file, it's portable. For example, you can save the .pst file to OneDrive, and then download it to your new computer. Or you can save it to a usb flash drive, plug the drive into your new computer, and then import your email, contacts, and calendar to Outlook.
Outlook 2010
Step 1 - Click File in the top left.

Step 2 - Choose Options.

Step 3 - In the Outlook Options box, choose Advanced.

Step 4 - Under the Export section, choose Export.

Step 5 - Click Export to a file, and then click Next.
Step 6 - Click Outlook Data File (.pst), and then click Next.
Step 7 - Select the name of the email account to export, as shown in the picture below. Only information for one account can be exported information at a time. Make sure that the Include subfolders check box is selected. Select Next.
Step 8 - Click Browse to select where you want to save the Outlook Data File (.pst) and to enter a file name. Click OK to continue. Note: If you have previously used the export feature, the previous folder location and file name appear. Make sure that you change the file name if you want to create a new file instead of using the existing file.
Step 9 - If you are exporting to an existing Outlook Data File (.pst), under Options, specify what to do when exporting items that already exist in the file.
Step 10 - Click Finish.The export begins immediately, unless you're creating a new Outlook Data File (.pst) or you're exporting it to an existing .pst file that is password protected. In those cases you'll get this dialog box:

Choose OK if you don't want to password protect your file. Otherwise, enter the password you'd like to set in the Password and Verify Password boxes, and then click OK. In the Outlook Data File Password dialog box, enter the password, and then click OK. If you are exporting to an existing Personal File Folder (.pst) that is password protected, in the Outlook Data File Password dialog box, enter the password, and then click OK.
Now that your Outlook data is in a .pst file, it's portable. For example, you can save the .pst file to OneDrive, and then download it to your new computer. Or you can save it to a usb flash drive, plug the drive into your new computer, and then import your email, contacts, and calendar to Outlook.
Outlook 2013 / 2016 and later
Step 1 - Open Outlook and click on File in the top left.

Step 2 - Click on Open & Export > Import/Export.

Step 3 - Select Export to a file.

Step 4 - Select Outlook Data File (.pts) and click Next.
Step 5 - Select the name of the email account to export, as shown in the picture below. Only information for one account can be exported at a time. Make sure that the Include subfolders check box is selected. Select Next.
Step 6 - Click Browse to select where to save the Outlook Data File (.pst). Type a file name, and then click OK to continue.
Note: If you’ve used export before, the previous folder location and file name appear. Type a different file name before clicking OK.
Step 7 - If you are exporting to an existing Outlook Data File (.pst), under Options, specify what to do when exporting items that already exist in the file.
Step 8 - Click Finish.
Thunderbird
Thunderbird has no inbuilt way to Import/Export emails, but you can easily find an Import/Export extension online and install it. Mozilla recommends this tool, but you can also save emails or group of emails manually as below:
Step 1 - Select the emails that you wish to back up. You can hold Ctrl and click to select multiple emails, or press Ctrl + A to select all emails in the current folder.
Step 2 - Right-click on one of the selected emails and select Save As.
This will create a .eml file which you can use to import your mail elsewhere. This Mozilla support article may also be of some help.
Mac Mail
Step 1 - Press Shift + Mouse Click to select all the folders you want to back up.
Step 2 - Click on Mailbox > Export Mailbox.
Step 3 - (1) Select the folder you want to save the backup in to (2) Click Choose.
Step 4 - Once saved, you'll see the backup file on your computer. You can store this file in another location for safekeeping.
Archive Guides
Email Archives are intended for reducing the size of an IMAP inbox. These will backup emails in a specified range (e.g. All emails older than 1yr) and save them into a single backup file on your computer. They are then automatically removed from your inbox and the server to save space.
Outlook 2010
Step 1 - Click on File > Info > Cleanup Tools > Archive.
Step 2 - Select:
(1) The Email Account you want archived.
(2) The date the archive should go back from.
(3) The directory the archive file should be saved to.
(4) Click OK once done.
Once this completes, an archive PST file will appear in the chosen folder on your computer.
Note: Once your emails are archived, you can safely delete them from your IMAP email account or Webmail. However, if your emails are important to your business, before you do this it's highly recommended you make 2 backups of your emails, one to a separate hard drive/USB, and another to an online storage service like Google Drive or Dropbox.
Mac Mail
Step 1 - Select all the emails you want to archive then click the Archive button.
Step 2 -The emails will be moved to the Archive folder.
Thunderbird
Step 1 - Select the emails that you wish to add to your Archive. You can hold Ctrl and click to select multiple emails, or press Ctrl + A to select all emails in the current folder.
Step 2 - Right-click on one of the selected emails and select Archive.
Step 3 - The emails will be moved to an Archive folder in Thunderbird.
Thank you for your feedback on this article.
Related Articles
© Crucial